
Product documentation
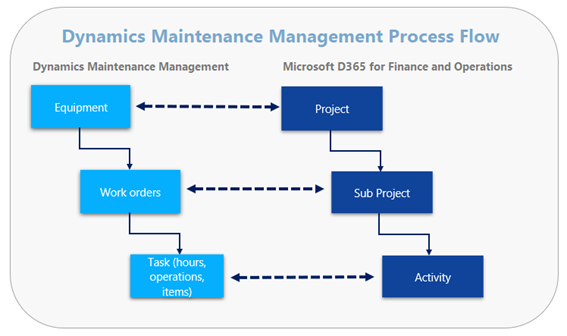
A task in Maintenance Management represents the work that has been performed on an equipment. Realization of hours, items, operations, travel cost, miscellaneous cost and revenue is done on the task. Besides the ability to register actuals, the task will also present forecast of needed hours, items and cost now a workorder task is created.
The task is always linked to a Work Order and can only be created for one equipment. There can be multiple tasks for one Work Order, for example when work is performed by multiple workers. Realized hours, cost and items are registered on the Work Order project, which is a subproject of the equipment.
In the following section it is described what setup in the Maintenance Management at least needs to be done, in order to start working with tasks. For full details on this setup, please refer to the implementation guide. The process of setting up entities like event codes and more advanced task functionality setup is also described in this user manual.
An Eventcode is the entity that defines the type of task the engineer/technician needs to perform in order to solve the related Work Orders. The first requirement is to list all possible Event codes in the eventcode setup table.
Go to Maintenance Management - HSO NN > Setup > Event codes.
This setup table allows for listing all Event codes. To create an eventcode, click ‘New’, and fill in the ‘Eventcode’ and ‘Event Description’. This is the minimum to create a working Eventcode. You will now be able to use this Eventcode on tasks.
Optionally, if the Eventcode is used for the "Work order Repair" workflow, tick the "Workflow Repair" checkbox and enter a "Workshop location".
Optionally, a "Title on Document" can be entered, which will be the title on documents created form tasks with this eventcode.
The Eventcode in combination with the Equipment type provides the option to create a defaulted forecast of the transactions this task will consist of. Therefore, Maintenance Management offers the opportunity to setup Equipment-specific settings for event codes. Although maintenance tasks by can be used without this setup, it is considered as an essential setup step. First, because upon maintenance task creation the drop-down menu ‘eventcode’ will only show event codes that have been setup in combination with the Equipment type of that task. Second, because no forecasted transactions will appear if the combination between the task’s Equipment type and eventcode has not been setup. There are two locations where default Task Forecasts can be created:
For limited, fast setup of the Equipment type - eventcode combinations, go to Maintenance Management - HSO NN > Setup > Event codes. Select an eventcode, then click the Equipment type button. A setup table will appear to setup Equipment types for the selected eventcode. Click "New". Select an Equipment type from the Equipment type drop-down, then enter the estimated duration. This estimated duration will default the estimated duration on an hour line for tasks with the selected eventcode - Equipment type combination. Also, a Bill of Material (BOM) can be defaulted. This Bill of Material is used as a spare-parts list, NOT as a total item list of the equipment (It represents a list of items commonly used for this Equipment type - eventcode combination.)
For full setup capabilities of the Equipment type - eventcode combinations, go to Maintenance Management - HSO NN > Setup > Equipment > Equipment Type. Select an Equipment type, then click the Event codes button. A setup table will appear with multiple tabs, to setup event codes for the selected Equipment type.
Click ‘New’. Select the eventcode from the event codes drop-down.
On the ‘Details’ tab, a Bill of Material can be defaulted This Bill of Material is used as a spare-parts list. Optionally, enter Title on document. This setup isn’t mandatory.
Enter the Estimated Duration. This estimated duration will default the estimated duration on an hour line for tasks with the selected eventcode - Equipment type combination. This is considered an important step but isn’t mandatory.
On the "Item Usage" tab, items can be selected from the product database that will be defaulted on the ‘item’ transaction section of the Maintenance Task. Also, a used quantity can be entered. This step is not mandatory.
On the "Operations" tab, specific or generic operations can be selected. These operations will be defaulted on the ‘operations’ tab of the Maintenance Task. This step is not mandatory.
Repeat this process for each eventcode relevant to this equipment type.
A Task can be created from the Work Order screen. After completing the Work Order form, click New in the workorder tab on the workorder form to create a task.
Task screen is then opened. Select Eventcode. Depending on settings an Eventcode needs to be selected or is already defaulted.
After selecting the Eventcode the task is created. Depending on the settings, forecasted lines like hours, items, travel, revenue and operations are visible on the task. All the necessary Work Order information, like the equipment, is copied to the task.
The Maintenance Task is now created having a task ID referring to the Work Order ID (e.g. Work Order ID = WRKORD-0000018 > Task ID = WRKORD-000018-##). A task is always created in the status proposed. In this status, the task can be used to forecast transactions.
From the ribbon in the Work Order and Task menu list pages. Go to Maintenance Management - HSO NN > Tasks > All Task or go to Maintenance Management - HSO NN > Work Orders > All Work Orders. A new task will be created for the selected line (Work Order of Task) in the grid.
From another task form. A new Task is created related to the same Work Order as the Task on which you are creating it. (e.g. to create a consecutive task for this work order).
From the Planned maintenance session. Go to Maintenance Management - HSO NN > Periodic tasks > Planned maintenance. By selecting Unique visit id`s one of multiple Maintenance Tasks can be created.
To realize a task, you need to perform several posting steps. When you post the task to the next step then the status of the task is automatically updated. A task status change can also automatically change the status of the related Work Order. For set up see automatic statusupdate.
See below a diagram of all possible steps and typical flow of a task. Also, the minimum posting steps that need to be done to realize the task and the options to undo several posting steps. The six statuses of a task are also shown in this diagram.
Reverse steps are shown in dark blue. These status change processes will be explained below.
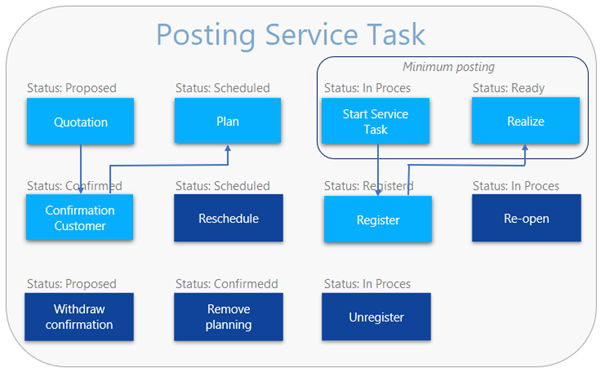
Click Maintenance Management - HSO NN > Tasks > All Tasks and select the correct Task. The default of the Task view is the line view. All the posting is done in the Manage tab which you can find in the ribbon of the Task.
Click on Confirmation to create a confirmation. The status of the task will be set to Confirmed. By clicking Withdraw confirmation the task will be unconfirmed, and the status will be set back to Proposed.
Next step is to plan the task by clicking Plan. The task will be planned for the Resource using estimated start (date and time) and estimated end (data and time) as plan window, which is set on the Hours line. When the task is planned the status of the task is Scheduled.
It is now possible to Reschedule the task (when resource, date and/or time is changed) or to Remove planning. When the latter is chosen the status will be changed back to Confirmed and the task can be scheduled again.
It is also possible to plan the task via the scheduling overview button on the control tab.
Click on Start Task to start the Maintenance Task. When this step is posted the status is set to in process. It is now possible to register all the actuals using the different lines on the task.
First the hour line must be registered by selecting worker and entering realized date, time and End date/time (Tip: when D is entered, the current day and time will be set). This will then automatically set the duration. Adding multiple lines is possible. When you want to change the invoicing status go to line details > Hour invoice status.
Next are item(s) that can be registered by clicking on Items. Forecasted items are visible here and used items can be added using add line. Availability of the item(s) are indicated by an icon ( or
or  ) on the line.
By changing the line property, you can decide if this line needs to be invoiced. If there are items on the task, it is mandatory to `deliver` the item(s). There are three ways to post the items, from the manage tab, items
From the Pick and Pack tab in the ribbon or use the Posting selection in top of the sales order line on the task. Depending on item settings, picking and/or packing posting needs to be done.
At least in the item tab, by selecting the line(s), click posting and depending on items settings, picking and/ or packing posting.
Note
When operations are performed on the task, they can be registered by clicking on Operations line. When set, operations which should be performed on the component (linked to the equipment), are visible here. By selecting the line, values can be registered in the line details tab. The executed tick box show that it is registered. The icon status( or ) shows if the operation has passed the test that has been defined. If the operation is not executed, the status returned value is a  .
.
Following thing that can be registered are miscellaneous cost; click on costs. Miscellaneous cost can be used to add all kind of cost (expenses) to a task, like cost for hotel, tools, etc. It is also possible to set a sales price if you want to charge this to the customer. Add a line and enter all necessary data like cost price, sales price and description. With the line property you can set if the line needs to be charged.
When all the lines are entered press Register on the manage tab to register all actuals. The task has now status Registered. It is also possible to Unregister the task; the status will be changed back to In process. It is now possible to add more lines when needed. When you are done, click Register again.
Now the task can be realized by clicking on Realize. Realizing means that all transactions will be posted to the project which allows you to create an invoice. On the posting screen you can choose if you want to update quantity All or only what is Registered. This makes it possible to post already registered lines. Then there is Report ready tick box which allows you to report the Maintenance Task as ready. Typically, ‘report ready’ is checked and update quantity ‘all lines’ are selected when the realization posting job is executed.
After realizing it is still possible to Re-open the task. Click on re-open. Now it is possible to add new lines (hours, items, etc.) These new added lines need also to be registered and/or realized. It is not in possible to delete already realized lines.
Note
The task has now status Ready and can the related Work Order can be closed or is closed automatically. Now the work order can be invoiced if no other open Work Orders are present.
Each task status change described above of "realizing a Maintenance Task will also pop-up a printing and posting screen. This means status changes have printing capabilities. Tasks cannot be created for Work Orders that are closed. Task statuses can also be viewed on the scheduling overview.